
Application guide
Polyurea Spray Application: Techniques and Best Practices
Applying polyurea correctly is as much an art as a science. The chemistry may be well-understood, but translating that chemistry into a defect-free, high-performance coating in the field requires careful equipment setup, proper surface preparation, skilled technique, and thorough quality assurance. This guide covers the fundamentals that any applicator or project manager working with polyurea spray systems should understand before the first trigger pull.
On this page
Equipment Requirements
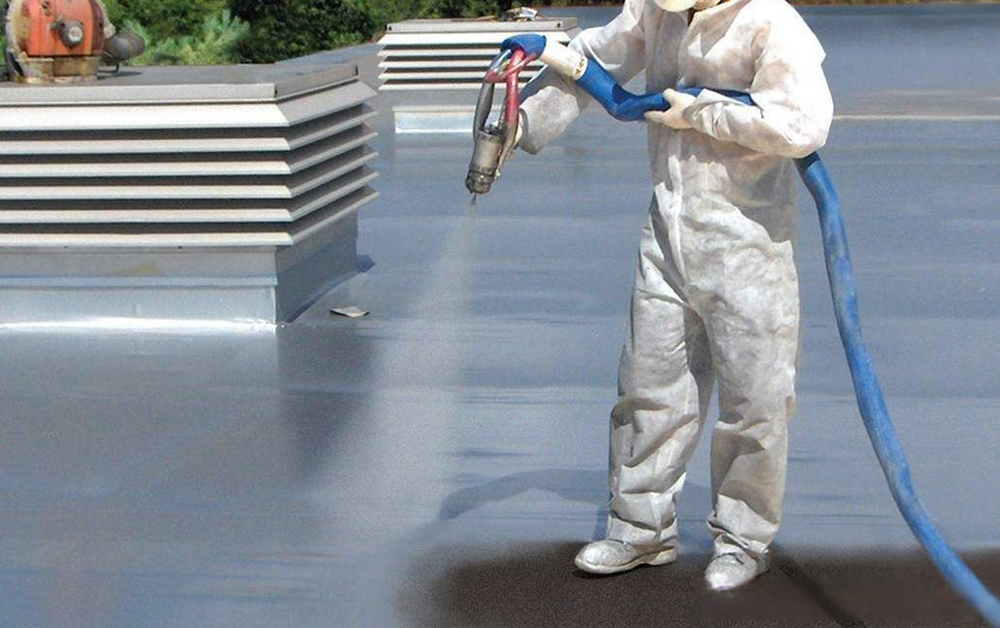
Polyurea’s fast reaction time makes conventional coating equipment completely unsuitable for its application. Standard airless spray equipment cannot deliver the mixing and temperature control needed to handle a material that begins reacting in seconds. Polyurea requires plural-component, high-pressure, heated spray equipment — typically referred to as a “hot plural spray rig.”
These machines heat both the A (isocyanate) and B (resin/amine) components to elevated temperatures, typically between 60°C and 80°C, to reduce viscosity and ensure proper atomization and mixing at the spray gun. The two components are pumped at high pressure — often 2,000 psi or more — and meet only at the impingement mixing chamber in the spray gun tip. This impingement mixing ensures thorough blending of the components immediately before they hit the substrate, enabling the fast, uniform reaction that produces a quality film.
Surface Preparation
No aspect of polyurea application is more important than surface preparation. The coating cannot compensate for a poorly prepared substrate. Adhesion failures — by far the most common mode of polyurea coating failure — almost always trace back to inadequate surface preparation rather than chemistry deficiencies.
For steel substrates, near-white blast cleaning (SSPC-SP10/NACE No. 2) is typically specified for corrosion-critical applications, with a surface profile of 2 to 4 mils (50 to 100 microns) to provide mechanical anchor. Concrete surfaces require shot blasting or scarification to open the surface and remove laitance, along with priming with a moisture-tolerant penetrating primer to seal the porosity and provide a stable bonding layer. All substrates must be free of oil, grease, dust, loose material, and moisture at the time of coating application.
Priming
Most polyurea systems benefit significantly from the use of a primer, even though polyurea’s moisture tolerance is often cited as making priming optional. A primer serves multiple functions: it seals substrate porosity that would otherwise generate outgassing during application, it improves adhesion by providing a chemical bonding layer between the substrate and the polyurea topcoat, and it provides UV protection for the substrate during the window between surface preparation and topcoat application.
Primer selection depends on the substrate type, the polyurea formulation being used, and the environmental conditions during application. Epoxy primers are commonly used for steel and concrete, while moisture-cured urethane primers work well for marginally damp concrete surfaces. Always verify primer compatibility with the polyurea system — using mismatched products can result in intercoat adhesion failure.
Application Technique
Skilled polyurea application requires attention to gun distance, travel speed, and overlap pattern. The spray gun should typically be held 18 to 24 inches from the substrate, though this varies with gun type and formulation. Travel speed and overlap must be consistent to achieve a uniform film thickness — uneven application creates thin areas susceptible to pinholing and thick areas prone to solvent entrapment and sagging on vertical surfaces.
Multiple passes are typically required to build the specified dry film thickness (DFT). Applicators should check film thickness periodically during application using a wet film thickness gauge, cross-referencing expected yield rates to ensure the target DFT will be achieved. Edge reinforcement — additional passes along edges, terminations, and penetrations — is standard practice to prevent edge lifting, which is a common point of failure in field installations.
Quality Assurance and Inspection
Post-application inspection verifies that the coating meets specification requirements before the project is accepted. Standard checks include dry film thickness measurement at multiple locations per unit area, holiday (pinhole) detection using a spark tester at the specified voltage, and adhesion testing using a pull-off adhesion tester. Documenting these results provides a baseline for future maintenance inspections and protects both applicator and owner in the event of performance disputes.
Temperature and humidity during application should be recorded continuously. Polyurea should generally not be applied when the substrate temperature is below dew point, as condensation on the surface will compromise adhesion. Most specifications require substrate temperature to be at least 3°C above the dew point. Monitoring and documenting these conditions throughout the project provides essential records for quality assurance and warranty compliance.
Was this helpful?
Thanks, that helps us decide what to write next.
From theory to the field
Want to apply this for a living?
Five quick questions match you with the right market, rig and training path.